
Stay in the Game: Fix Secure Boot and TPM Issues for Call of Duty and Battlefield.
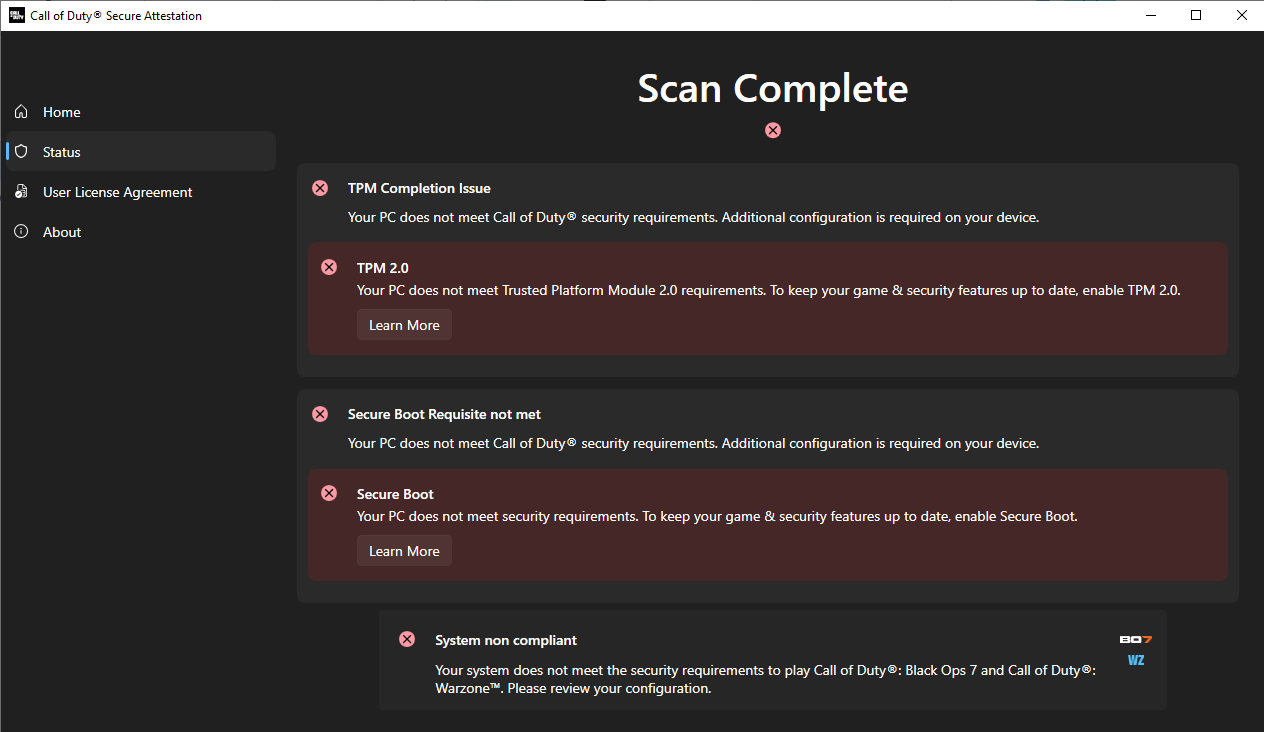
Have you seen a pop-up like this when you’re trying to play COD or Battlefield?
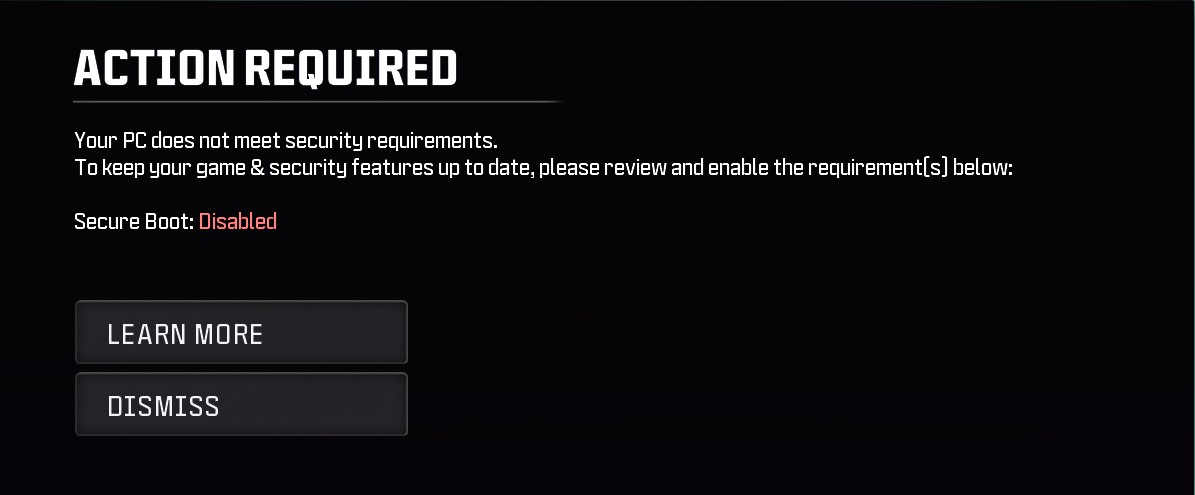
These games use anti-cheat technology, such as Ricochet for Call of Duty and Javelin for Battlefield, that require certain security features to be active and up to date on your PC. Specifically, TPM and Secure Boot are used to better ensure fair play.
Due to this, your PC needs Secure Boot enabled, TPM enabled, and your BIOS version may need to be updated so the TPM version and Secure Boot keys are up to date.
A list of games we’re aware of this requirement in: Call of Duty: Warzone, Call of Duty: Black Ops 7; Battlefield 6, Battlefield 2042.
In some cases you can dismiss this and play, but if you don’t fix it, your matchmaking may be restricted. Make sure you continue to get the full experience from your games by enabling these security features.
The notification should tell you exactly what to do. But if you’re not familiar with these features on PCs, you may be a bit lost. We’ll cover the steps to enable these features, from the basics to some troubleshooting in case things aren’t working as planned.
You may need a flash drive for some steps. Get one from a reputable brand like Lexar or SanDisk. There are dubious ones on the market that may not work at all.
Helpful Basics
Start here if you’ve never done anything like this before. If you get stuck on another step in this guide, return here. This section covers some basic PC skills for the steps.
BitLocker Recovery Screen:
If you perform a step in this guide and are blocked from booting to Windows by a Bitlocker Recovery screen asking for your key at startup, you’ll need to find your key.
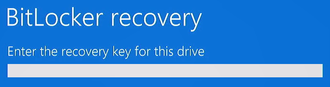
- Log in with your Microsoft account here.
- Find the key next to your PC’s name. Enter it in the BitLocker Recovery screen.
- Yes, all 48 characters. The dashes will add in automatically.
- If your keyboard isn’t letting you type:
- Try unplugging it and plugging it back in.
- Plug it into a USB port on the back of the PC that connects directly to the motherboard with black plastic in it (USB 2.0).
- If it’s wireless, try a wired one, plugged into the back.
Find Root Install Folder for a Game
Some steps require locating your root install folder for the game you’re troubleshooting.
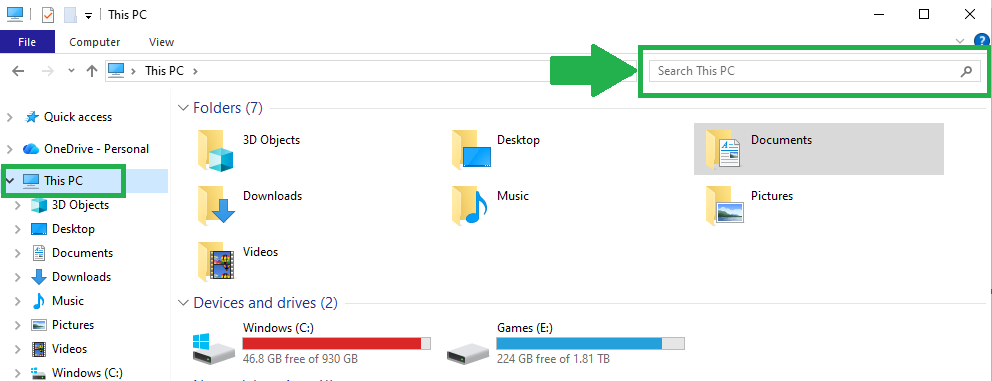
First, press Windows key to open your start menu. Search File Explorer and open this application. Then you can search your PC’s files or look for it manually.
- Locate it manually in File Explorer:
- Open the drive the game is on, then open the Program Files (x86) folder.
- Find the folder for the launcher service (Blizzard, Steam, etc.) you use.
- Search in the launcher service folder until you see the name of your game. Open that folder. This should be the root install folder.
- You may have to look inside folders within the launcher service folder for it. For example: Steam>steamapps>common>[game].

- Use a File Explorer search for all files on your PC:
- Select This PC in File Explorer so all files will be searched.
- Type the name of the game in the search field. This may take some time.
- Select the root install folder. It should have the same name as the game.
Call of Duty Secure Attestation Wizard
For Call of Duty games affected, this application can help get your PC ready to play.
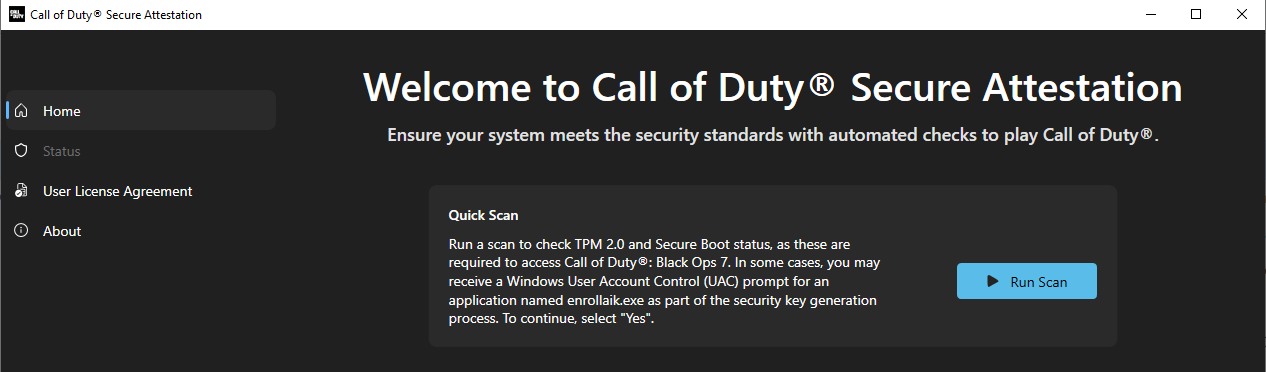
- Download the Secure Attestation Wizard from Activision, or find it in your Call of Duty root install folder.
- Run the application and scan your PC. If it isn’t ready, the Wizard tells you what it thinks needs to be fixed.
- If your Attestation Wizard says your PC should be ready to go, but you still get a pop-up when you try to play, proceed to Troubleshooting.
Motherboard Manual, BIOS Versions, and Secure Boot State
You might need to find your motherboard’s product page in order to check the manual for help navigating BIOS menus, or to download BIOS update files. Here’s how to do it:
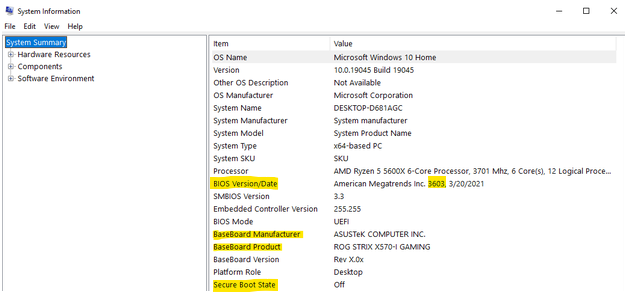
- Press Windows key and search System Information. Open this app.
- Find your BIOS version, motherboard manufacturer and model, plus secure boot.
- Model is Baseboard Product.
- Search your motherboard’s manufacturer name and model in a web browser.
- Find the product page for your motherboard from the official brand’s website.
- Find the Support section for the specific motherboard on its product page.
- Some websites have a general Support menu at the top of this page. This isn’t what you need. Look for a link lower in the content of this page.

- In the Support section, you should find the manual, BIOS updates, and drivers.
- Some motherboards have these resources for multiple board versions. Check the BIOS list for each version in support. The one with a BIOS version name that matches yours is the right one.
Access BIOS
Many steps in this guide will require you to get into BIOS. There are two easy ways:
Method 1 - Startup Key:
- Turn your PC off, and start it up again.
- Right as you initiate the startup process, begin pressing the Del (Delete) key repeatedly. Keep pressing.
- Del is a common key. Check which key to use on the bottom of your motherboard splash screen during startup, or in the manual.
- If your PC does not go to BIOS, try again. The timing can be tricky.
Method 2 - Recovery Mode:
- Open Settings and click on Recovery.
- In the Recovery section, click Restart Now under Advanced Startup.
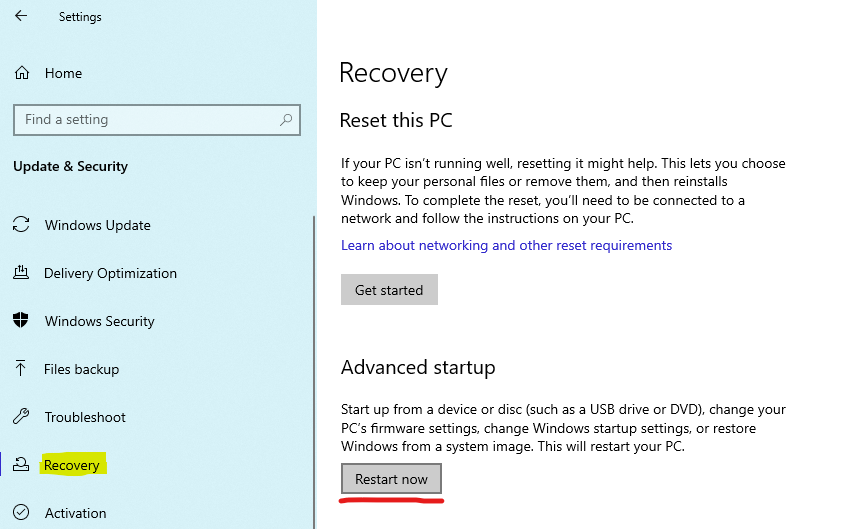
- Your PC will restart in the Recovery Environment.
- Once you’re in the Recovery Environment, click Troubleshoot.
- Click Advanced Options, then click UEFI Firmware Settings.
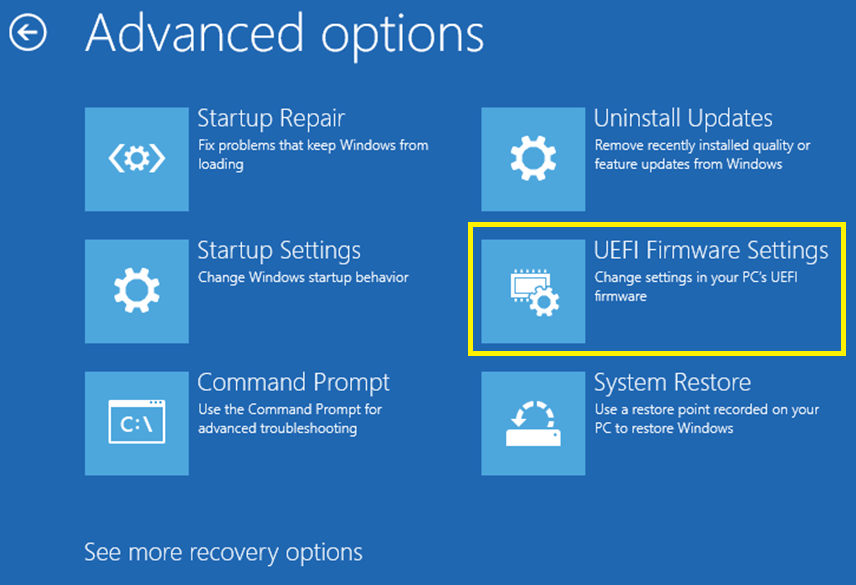
- Your PC will restart again, and this time it should start in the BIOS menu.
Enable/Update Security Features
Secure Boot
Check your Secure Boot state in System Information. This indicates whether secure boot is detected as on by Windows. See Helpful Basics if you need help finding this.
If it’s not enabled here, check your BIOS settings to see if it is enabled:
- Find Secure Boot in Boot or Security menus at the top of the BIOS screen.
- Enter advanced mode if you don’t see these menus.
- Find Secure Boot and click it to open Secure Boot settings.
- If you don’t see it, you may need to disable CSM (Compatibility Support Module). This is also commonly found in the Boot menu.
- Still don’t see Secure Boot? Save and exit, restart the PC, get into BIOS and check again. It should show now.
- If you don’t see it, you may need to disable CSM (Compatibility Support Module). This is also commonly found in the Boot menu.
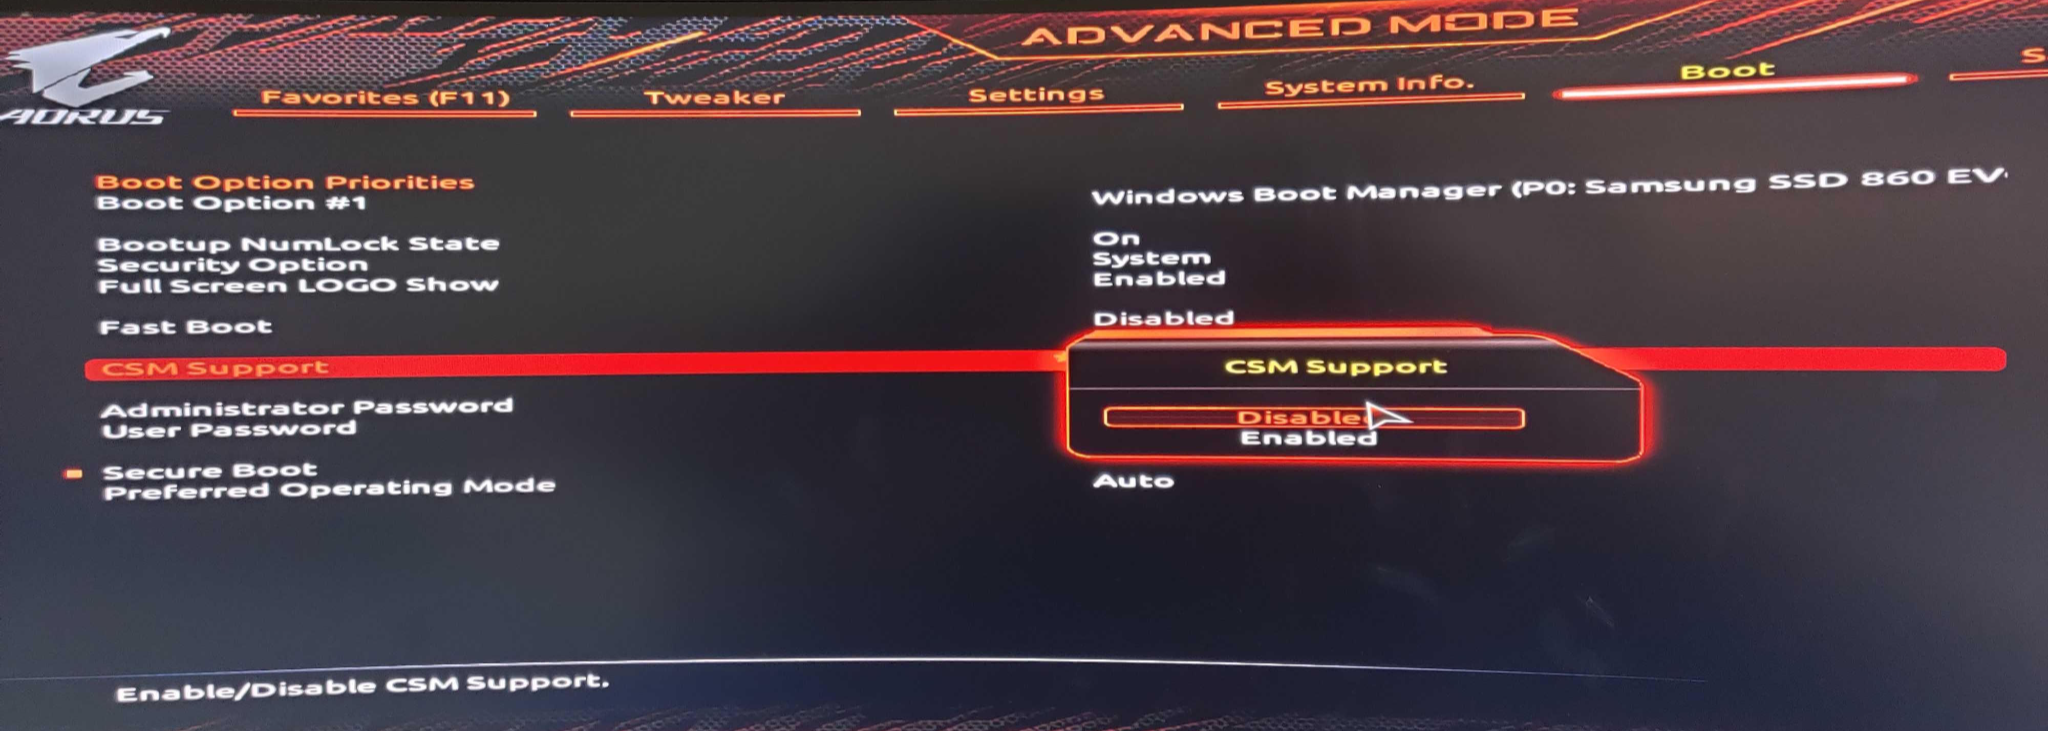
- Check if Secure Boot is enabled. If it is not, enable it.
- If it is, try Troubleshooting sub-section Reset Secure Boot Keys.
TPM
You’ll also need to be in BIOS to access TPM settings.
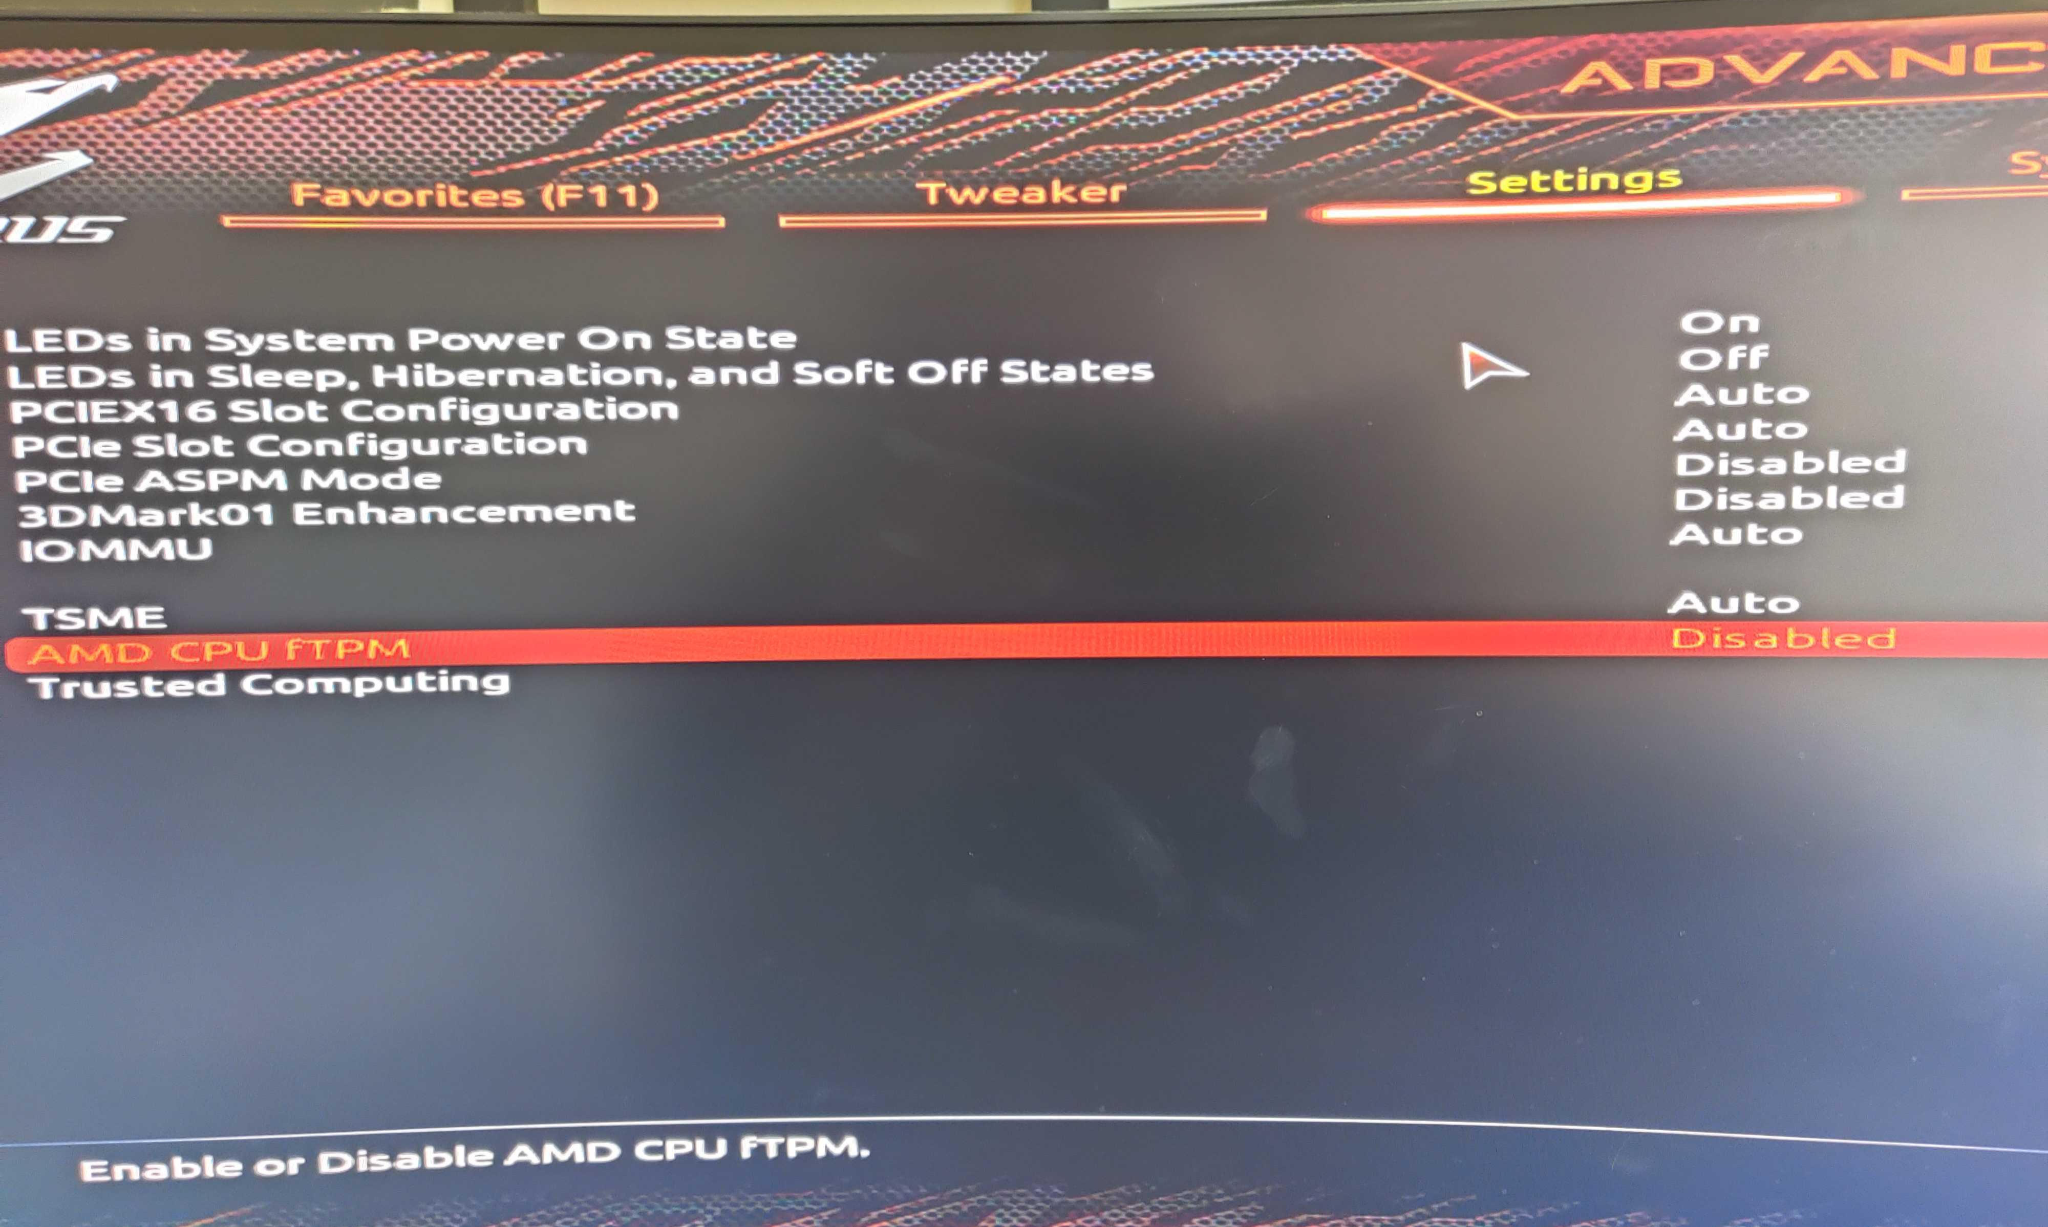
- Click Trusted Computing or TPM Configuration in the CPU settings, Advanced settings, or Miscellaneous settings of your BIOS.
- You may need to enable advanced mode. See Helpful Basics for more.
- Check if TPM is enabled. If it’s not, enable it.
- If you have an AMD CPU, check if AMD fTPM switch is set to AMD CPU fTPM.
Update BIOS
After enabling TPM and Secure Boot, you may get a message that there is still an issue with one of them, or to update BIOS. Updating BIOS may be necessary to update the TPM version, Secure Boot keys, or both. You’ll need a flash drive for this.
Check for Relevant Updates:
See if there are BIOS updates for your PC that update the TPM version or Secure Boot keys by following these steps:
- Check your current BIOS version in System Information.
- Go to the BIOS versions section of the motherboard’s support page.
- Find the current BIOS version. See if you’re up-to-date or updates are available.
- If there are updates, read the notes. See if any mention an update to the TPM version or Secure Boot keys.
- If one does, proceed with updating BIOS. Use the latest version or the most recent one with notes for updating TPM version or Secure Boot keys.
- If there aren’t any, try the steps listed in Troubleshooting. If those don’t work, try updating your BIOS to the latest version anyway.
How to Update BIOS:
Once you’ve got the file you’ll use for your update downloaded, check out this video guide by our staff member Kelsey for the rest of the steps to update your BIOS. Remeber that you can refer to your motherboard's manual for help navigating BIOS.
After you update your BIOS, your BIOS settings will return to default. Typically this means a certain setting we usually enable in our gaming PCs that allows RAM to run at a higher speed will need to be turned back on, as it's turned off by default. This setting is the XMP/EXPO profile. Follow the steps in this other video guide by Kelsey to get your XMP/EXPO profile re-enabled.
If you’re still having trouble after the update, try the steps in the Troubleshooting section.
Troubleshooting
If you’ve tried enabling TPM and Secure Boot, plus updated your BIOS if needed, but you’re still having trouble, try these steps below to potentially resolve the issue.
Reset Secure Boot Keys
Sometimes the Secure Boot keys need to be reset to be detected properly. You’ll need to get back into BIOS for this.
- Find Secure Boot in the Boot or Security menus at the top of the page.
- Enter advanced mode if these menus aren’t there. See Helpful Basics for more help.
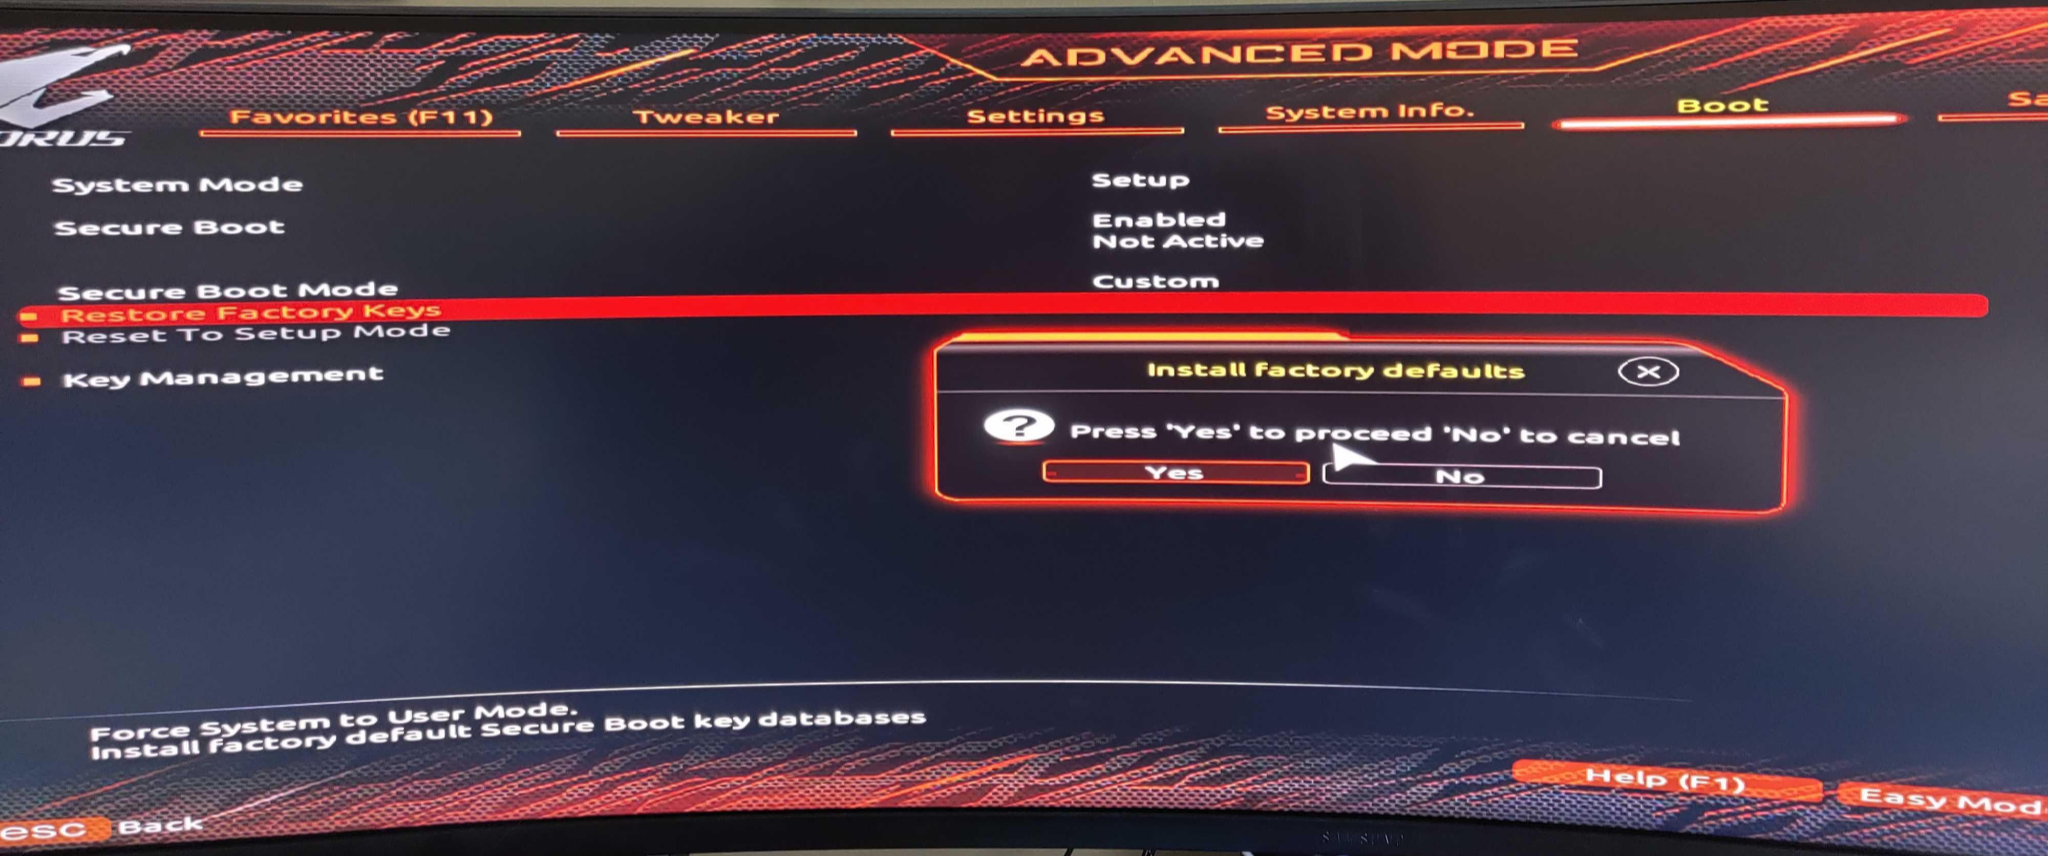
- In the Secure Boot settings section, you should see something like “enroll default keys” or “reset keys”. Click on it and click yes to proceed.
- You may need to open a “Key management” window within the Secure Boot settings to find it.
- If you don’t see it, switch Mode from Standard to Custom.
Clear TPM
You can clear your TPM settings through BIOS or Windows.
To clear TPM in BIOS:
- Find TPM settings in CPU, Advanced, or Misc. Enter advanced mode if needed.
- Check Helpful Basics for more guidance.
- You should see an option to Clear TPM. Click this and proceed.
- Restart the PC.
To clear TPM from your Windows desktop:
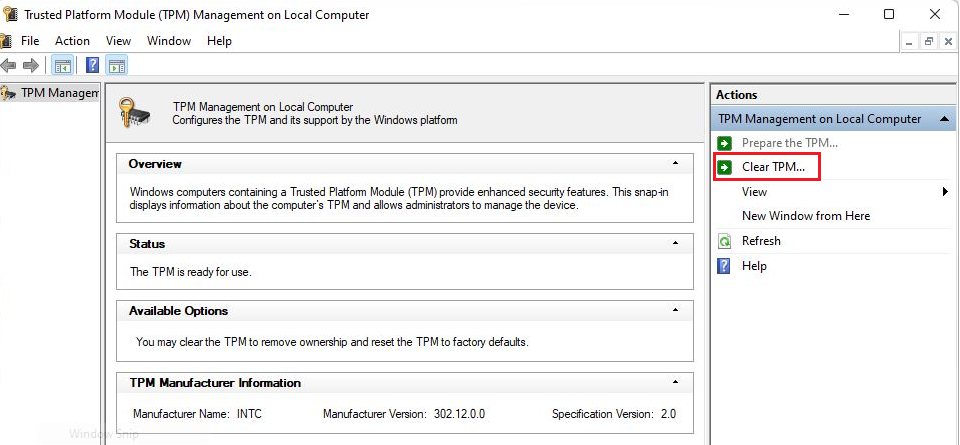
- Press Windows key + R. Then type tpm.msc and press Enter.
- In the TPM Management window, click Clear TPM from the menu on the right.
Disable and Re-enable Security Features
Some of our techs had success revolving this issue by completely disabling both TPM and Secure Boot, turning CSM (Compatibility Support Module) on, saving, then reversing all of that.
- Find TPM settings in BIOS. Change TPM to disabled. Turn off AMD fTPM switch too if applicable.
- Find Secure Boot settings. Disable Secure Boot.
- Find CSM (Compatibility Support Module) Settings. Enable CSM.
- Save your changes and exit. Then, restart your PC and get into BIOS again.
- Disable CSM, enable Secure Boot and TPM, plus AMD fTPM switch if applicable.
- If you don’t see Secure Boot after disabling CSM, save and restart.
- Save changes and exit.
- Restart your PC.
Allow Applications Through Windows Firewall
Windows security features can interfere with other applications running. Try allowing all applications necessary for the game through the Windows firewall.
For a Call of Duty game, make sure the enrollAIK.exe, broker service installer, and the broker service applications from your root Call of Duty install folder are allowed through the firewall as well. If you can’t find enrollAIK.exe, see the section below on moving it.
- In your Start menu search “allow an app through Windows firewall”.
- Click the Control Panel link that comes up with that name.
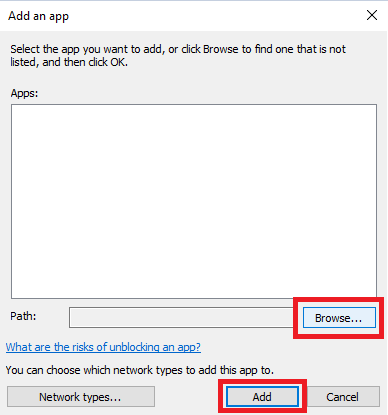
- Click Change settings, then Allow another app.
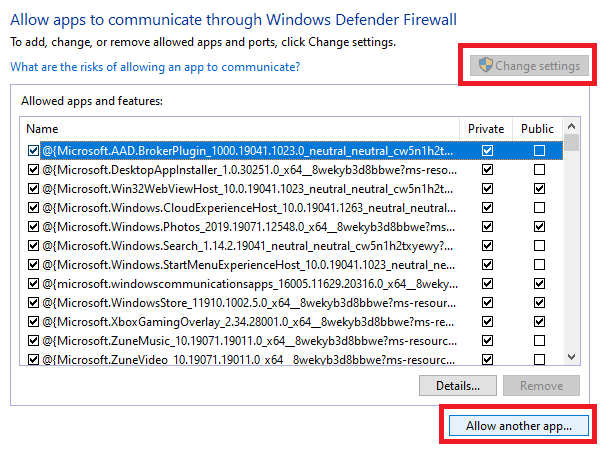
- Next to the Path box, click Browse, and find your root install folder for your game.
- In the root install folder, look for any application type files. Add each one.
Call of Duty Specific Troubleshooting
Launch Dependency Applications
There are some important dependency applications for COD that don’t always work correctly on their own. You may need to find them and launch them manually, then restart your PC to get them working properly again.
- Find your Call of Duty Root Install Folder. See Helpful Basics for help.
- Right click each of these and launch them as administrator:
- CODBrokerInstaller.exe, CODBrokerService.exe, enrollAIK.exe
- If you can’t find enrollAIK.exe, see the section below on moving it.
Set Broker Service to Manual Startup
In some cases, launching these programs is not enough. You may need to change the startup settings for one of these applications. Specifically, the COD Broker Service.
- Press Windows key + R. Type “Services.msc” and press Enter.
- Find COD.Broker.Service in the Services. Right click it and choose Properties.
- In the Properties Window, click the Startup type dropdown list and select Manual.
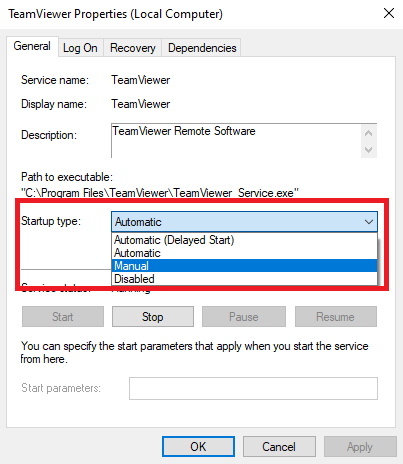
- Click Apply, then OK. Restart your PC.
Move enrollAIK.exe Application
Sometimes this important application gets stored in or moved to the wrong place. We’re not 100% sure why it happens, but you’ll need to find it and move it back into the Call of Duty root install folder, then run it. It only works properly if it’s in the correct folder.
- Search enrollAIK.exe in all your PC’s files using Windows File Explorer.
- See Helpful Basics for guidance. The search will take some time.
- You can check C:\Users\[Your Username]\AppData\Local\Temp.
- Sometimes it’s there, but Windows search is more reliable.
- Once you find it, move it back to your root Call of Duty install folder.
- Right-click and run the enrollAIK.exe app as administrator.
- Restart your PC.
Edit PC's Registry to Refresh TPM Endorsement Certificate
There is a file in your PC that holds information about your BIOS. This is what the Call of Duty Attestation Wizard reads to make its assessment.
In some cases, even after a PC’s BIOS has been updated to the latest version, this file fails to update properly. This means that when the Attestation Wizard reads that file, it will be reading the old information from before the BIOS update.
We have especially noticed this issue with PCs that have an ASRock B760M-C/D4 motherboard, even when the BIOS is updated to the latest version available at this time (9.02).
You can fix this by deleting a specific registry value and restarting your PC, which will force it to re-generate.
Please be careful when you are editing the registry in your PC, as deleting other important files not related to this fix could cause issues.
It is a useful precaution to prepare a USB flash drive with the media to reinstall Windows just in case something like that happens, as a clean Windows reinstall via USB should fix it.
Watch our video guide for a clean Windows reinstall for the steps to prepare a reinstall USB. It tells you to use a different PC, but that is for reinstalling on a PC that won't boot. If you're preparing this in advance, use your PC.
Here are the steps to edit your registry:
- Press your Windows key + R at the same time.
- Type regedit and click Ok.
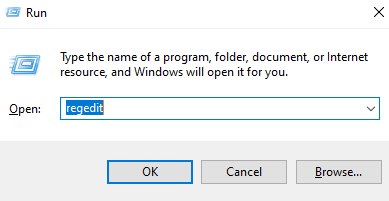
- If you are prompted by User Account Control, click Yes.
- In your registry, navigate to this exact path: HKEY_LOCAL_MACHINE\SYSTEM\CurrentControlSet\Services\TPM\WMI\
- Inside the WMI folder, look for the Endorsement folder.
- Right click the Endorsement folder and Delete it.
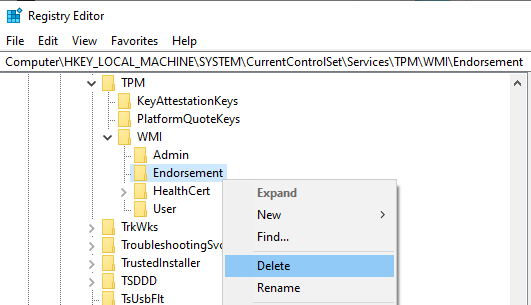
- Restart your PC. After this, Windows should re-generate an updated TPM endorsement certificate for your PC.
- Run the Attestation Wizard again, and it should report that you’re good to go now.
PC Won’t Start to Windows After Secure Boot is Enabled
If your PC won’t start to Windows after enabling Secure Boot and disabling CSM (Compatibility Support Module), check if your drive partition style is compatible with those settings. If not, you’ll need to convert it to proceed.
First, disable Secure Boot and re-enable CSM again, then follow the steps below.
Check Partition Style of Drive
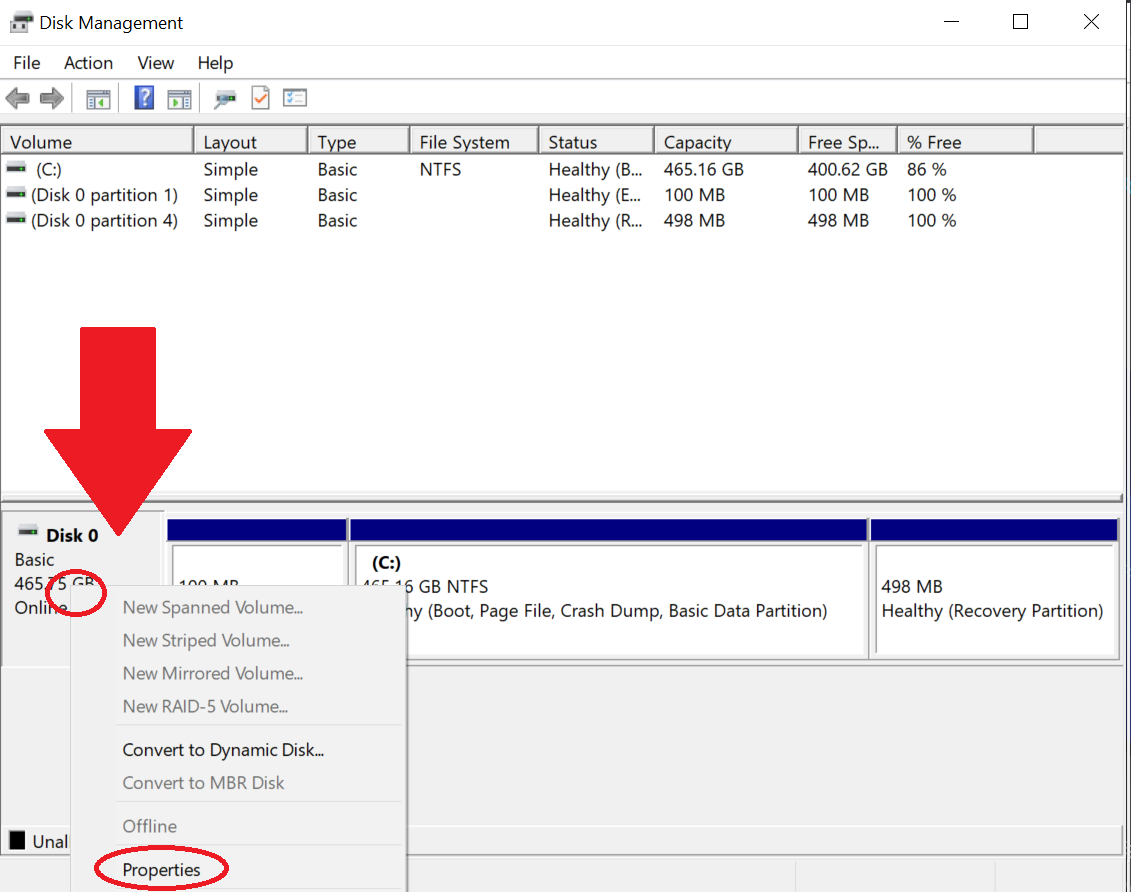
- Press Windows key and search Disk Management. Open the Create and format hard drive partitions app.
- Right click the drive Windows is installed on.
- It’s a square labelled Disk and a number, halfway down this window. It should have a C: partition for Windows inside.
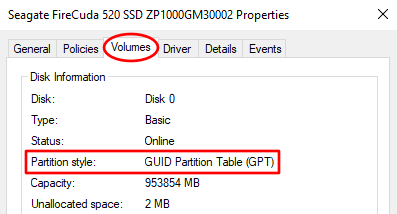
- Select Properties, then click on the Volumes tab in the Properties window.
-
- By Partition style, you’ll see Master Boot Record (MBR) or GUID Partition Table (GPT). If you see MBR, follow the next steps to convert the drive.
Prepare to Convert Drive
- Update your Windows to at least Windows 10 version 1809 or later.
- Please back up your data from the drive you are converting.
- Converting a drive from MBR to GPT comes with a chance for data loss.
- Disable Bitlocker Encryption to avoid the Bitlocker Recovery screen.
- The drive Windows is installed on needs three partitions or less.
- Check in Disk Management/Create and format hard disk partitions.
- Delete partitions if needed, but back data up from them first.
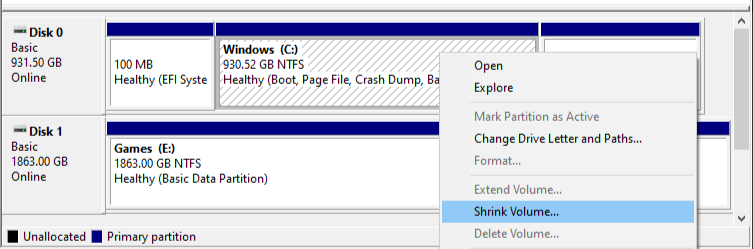
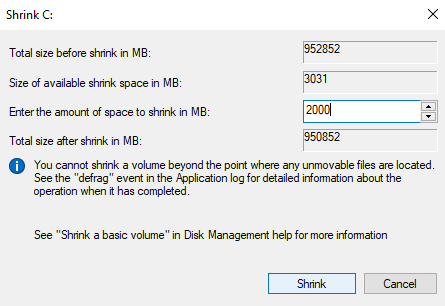
- You need unallocated space on the drive to create a new partition. Shrink a partition in disk management if needed. 2 GB should do the trick.
- Open the Disk Management/Create and format hard disk partitions app.
- Right a partition on the drive. Use one that is not the Recovery Partition.
-
- Click Shrink Volume. In space to shrink, enter 2000 MB, then click Shrink.
- If you can’t shrink up to 2000 MB, the drive may be too full.
- Click Shrink Volume. In space to shrink, enter 2000 MB, then click Shrink.
Convert Drive from MBR to GPT
- Access Recovery Mode. See Helpful Basics>Access BIOS>Method 2 above.
- Click Troubleshoot, then Advanced options, then Command Prompt. Select your administrator account and sign in.
- Type this command to validate the drive meets the requirements, then press Enter: mbr2gpt /validate
- If validation completes successfully, type this and press enter to convert: mbr2gpt /convert then let this process complete. Then turn off your PC.
- Your drive should be in GPT partition style. Check Disk Management to confirm.
Tried Everything Else? Try a Clean Windows Reinstall.
In some cases where folks have tried everything else, a clean Windows 11 reinstall did the trick. Here are some tips and our guide if you want to try it:
- Back your files up first.
- A clean Windows reinstall deletes all files from the drive you’re installing on, and other drives are at risk of accidental data loss during the process.
- You’ll need that flash drive for this process.
- Ensure the flash drive doesn’t have any important files on it and is the only external storage device connected to your PC when you run the Windows installation media creation tool on your PC to avoid accidental data loss.
- Check out our video guide for performing a clean Windows reinstall.
- It says to use another PC to run the Windows installation media creation tool, but that’s for PCs that won’t boot to Windows. Use your PC.
Known Issues
Unfortunately there are some cases at the present moment where you won’t be able to get these settings and the game’s ability to detect they’re enabled to work properly on your hardware no matter what you do. Check below to see if you’re affected.
AMD TPM Version Issue
Some combinations of motherboards and CPUs are affected by an issue with their TPM version that causes TPM attestation failure, even though it is a version past TPM 2.0.
One example of this is an AMD codename “Pinnacle Ridge” CPU on an ASRock B450m/ac motherboard. AMD has a support page explaining this issue.
You can check your TPM version to see if you’re affected by this:
- Press Windows key and search Powershell in your start menu.
- Right-click Powershell and run as administrator. Type get-tpm and press Enter.
- Powershell will show TPM info. Check the number next to ManufacturerVersion
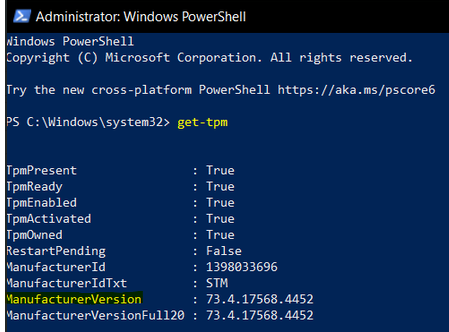
- Reference that number against the ones listed in the table on AMD’s page.
- A TPM with a ManufacturerVersion of 3.*.0.* is affected.
If your TPM is one of the affected versions, you’ll need to see if there are any BIOS updates that also update the TPM to another version. If there are, try that.
What can you do about this if there is no update? Not much, unfortunately. You can try contacting your motherboard manufacturer requesting a fix for this for your specific motherboard and CPU combo. Include the models of each if you can.
No BIOS Update for TPM Version or Secure Boot Keys
If your TPM version isn’t 2.0 or higher, or your Secure Boot keys are out of date, but there isn’t a BIOS update available for your motherboard to fix that, there won’t be much you can do with your current hardware to resolve this situation on your own.
Try contacting the manufacturer of the motherboard requesting a BIOS update to update the TPM version or Secure Boot keys. We can’t guarantee they’ll fulfill the request, but it doesn’t hurt to ask.
You may need to look into newer hardware that will be able to support these features.
Want More Help?
If you have a Skytech Gaming PC, our support team is happy to do their best to help you resolve this issue if you’re having trouble with the steps on your own.
Just contact us by phone, email. Or LiveChat. We will see if we can help you resolve the issue or figure out what the cause is.
If you don’t have a Skytech Gaming PC, try contacting the support team for the game. In the case of Call of Duty, Activision has also provided this guide. EA has provided this support page for Secure Boot for Battlefield.